Showing posts with label Java Script. Show all posts

Sunday, May 28, 2017

How To: Set and Get Cursor Position in Textbox using JQuery

In this tutorial, we 'll learn how to set and get cursor position in text box using jquery.
1). Open notepad, and paste following html code in it.

<html>
<head>
 <title>Home</title>
</head>
<body>
 <input id="first_name" type="text" value="webdesignpluscode" />
 <input onclick="SetPosition();" type="button" value="Set Position" />
 <input onclick="GetPosition();" type="button" value="Get Position" />
</body>
</html>

2). Click File then Save As... in notepad menu. Save As dialogue will open
3). Enter "home.html" in File name:
4). Select All Files in Save as type:
5). Click Save. Notepad file will be saved as html page.
6). Now open this html page in edit mode.
7). Add following online JQuery library reference inside <head> tag.

<script src="https://code.jquery.com/jquery-1.10.2.js" type="text/javascript"></script>

You can download and add to project locally.

8). Now add java script block inside <head> tag and copy following code there.


<script type="text/javascript">

// Set Cursor Position
 $.fn.setCursorPosition = function (position)
{
 this.each(function (index, elem) {
 if (elem.setSelectionRange) {
 elem.setSelectionRange(position, position);
 }
 else if (elem.createTextRange) {
 var range = elem.createTextRange();
 range.collapse(true);
 range.moveEnd('character', position);
 range.moveStart('character', position);
 range.select();
 }
 });
 return this;
 };

 // Get cursor position
 $.fn.getCursorPosition = function ()
{
 var el = $(this).get(0);
 var position = 0;
 if ('selectionStart' in el) {
 position = el.selectionStart;
 }
 else if ('selection' in document) {
 el.focus();
 var Sel = document.selection.createRange();
 var SelLength = document.selection.createRange().text.length;
 Sel.moveStart('character', -el.value.length);
 position = Sel.text.length - SelLength; }
 return position;
 };

 function SetPosition() {
 $("#first_name").setCursorPosition(5);
 $("#first_name").focus();
 }

 function GetPosition() {
 alert($("#first_name").getCursorPosition());
 $("#first_name").focus();
 }
 </script>

Complete code can be downloaded from this git repository.

This is all. You have done. Save file, and view it in any browser.

Monday, February 29, 2016

How To: Add Marker/Pin on Google Map

In this lesson we will learn how to add pin/market on google map at specific point (coordinates: latitude and longitude). Add following code to add google map in html page with basic map properties.

<html>
<head>
    <title>Google Map!</title>

    <script src="http://maps.google.com/maps/api/js?sensor=false" type="text/javascript"></script>
    <script type="text/javascript">
        var map = null;

        function initialize() {
            var latlng = new google.maps.LatLng(31.536648, 74.343443);
            var myOptions = {
                zoom: 12,
                center: latlng,
                mapTypeId: google.maps.MapTypeId.ROADMAP
            }

            map = new google.maps.Map(document.getElementById("map_area"), myOptions);

        }

    </script>
</head>
<body onload="initialize()" style="width: 98%; height: 100%;">
    <div id="map_area" style="width: 100%; height: 520px;">
    </div>

</body>
</html>

Now create another java script function AddMarker() to add pin on google map, in this function we will set basic properties of pin like its position ( coordinate: latitude and longitude) and its title. Add following code in <script> </script> tag inside head section of web page.

        function AddMarker() {          
            var myLatlng = new google.maps.LatLng(31.5136648, 74.343443);
            var marker = new google.maps.Marker({
                position: myLatlng,
                map: map,
                title: 'Lahore, Pakistan.'
            });
        }

Now create a new button in html and call this function on onclick event of button. Add following code immediately before </bode> tag.

<input type="submit" onclick="AddMarker()" name="button" title="Add marker" />

Complete code of all steps is

Add Pin on Google Map
Add Marker/Pin on Google Map

This is all. You have done. Save file and view in browser.

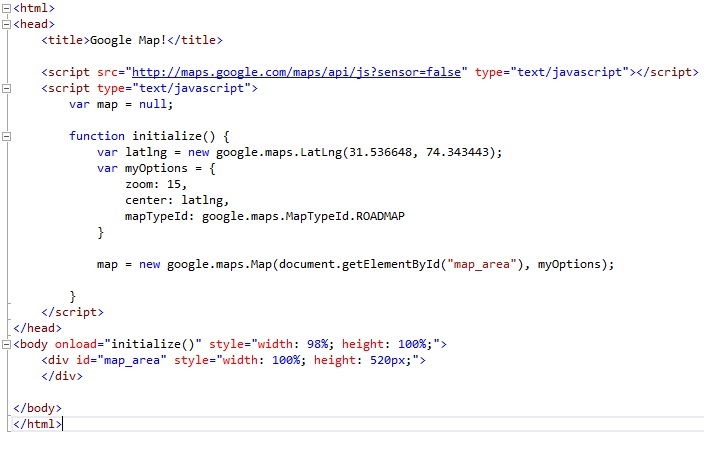
How To: Add Google Map in Html Page

Adding google map to html page is very easy and a common practice now a days. In this tutorial we will learn how to add google map in web page step by step.
First create a basic structure of html page.
Open any text editor, paste following code there and save it as GoogleMap.html file.

<html>
<head>
    <title>Google Map!</title>

</head>
<body style="width: 98%; height: 100%;">
    <div id="map_area" style="width: 100%; height: 520px;">
    </div>
</body>
</html>

Now add following google api reference in page head section.

<script src="http://maps.google.com/maps/api/js?sensor=false" type="text/javascript"></script>

Now we will create a java script function to initialize google map.  We will set basic map properties in this function while initialization. Add following function in page head section inside <script> </script> tags.

<script type="text/javascript">
        var map = null;

        function initialize() {
            var latlng = new google.maps.LatLng(31.536648, 74.343443);
            var myOptions = {
                zoom: 15,
                center: latlng,
                mapTypeId: google.maps.MapTypeId.ROADMAP
            }

            map = new google.maps.Map(document.getElementById("map_area"), myOptions);

        }
    </script>

Now call this function on onload event of body of web page.

<body onload="initialize()" style="width: 98%; height: 100%;">
    <div id="map_canvas" style="width: 100%; height: 520px;">
    </div>
 
</body>

Complete code of all setps will look like:

Add Google Map in Html Page

This is all. You have done. Save file and view in browser.

Sunday, February 28, 2016

How To: Call Java Script Function from Silverlight

In this tutorial we will learn, how to call java script function from silver light using C#. HtmlPage.Window.Invoke function is used invoke the java script method from silver light application.

Add following C# code, where you want to call java script function.

HtmlPage.Window.Invoke("SayHello");

Add following java script code in aspx or html page in silver light web project.

function SayHello()
{
alert('Hello! function called from silverlight');
}

Java script function with parameters:

To call java script function with multiple input parameters, add following C# code in .cs file.

HtmlPage.Window.Invoke("SayHello", "Waqas", "A");

Add following java script function in aspx or html page in silver light web project.

function SayHello(fname, lname)
{
alert('Hello! ' + fname + ' ' + lname +
' -function called from silverlight');
}

This is all. You have done.
Build project and view in browser.

Saturday, February 27, 2016

How To: Integrate HTML Page in Silverlight Application

Integrating Html page in silver light application is little tricky at first. In this tutorial we will learn how to display html page in silver light application step by step.

Add following code in silver light  html page immediate before </form> tag.

<div id="BrowserDiv">
<div style="vertical-align:middle">
<img alt="Close" align="right" src="Images/Close.png" onclick="HideBrowser();" style="cursor:pointer;" />              
</div>
<div id="BrowserDiv_IFrame_Container" style="height:95%;width:100%;margin-top:37px;"></div>
</div>

Add following css code in page.

<style type="text/css">

#BrowserDiv
{
position:absolute;
background-color:#484848;
overflow:hidden;
left:0;
top:0;
height:100%;
width:100%;
display:none;
}

</style>

We need following javascript code to show and hide htm page.

<script type="text/javascript">

var slHost = null;
var BrowserDivContainer = null;
var BrowserDivIFrameContainer = null;
var jobPlanIFrameID = 'JobPlan_IFrame';

$(document).ready(function () {
slHost = $('#silverlightControlHost');
BrowserDivContainer = $('#BrowserDiv');
BrowserDivIFrameContainer = $('#BrowserDiv_IFrame_Container');
});

function ShowBrowserIFrame(url) {
BrowserDivContainer.css('display', 'block');
$('<iframe id="' + jobPlanIFrameID + '" src="' + url + '" style="height:100%;width:100%;" />')
.appendTo(BrowserDivIFrameContainer);
slHost.css('width', '0%');
}

function HideBrowser() {
BrowserDivContainer.css('display', 'none');
$('#' + jobPlanIFrameID).remove();
slHost.css('width', '100%');
}

</script>

Add reference to following jquery file.


<script type="text/javascript" src="Scripts/jquery-1.4.2.min.js"></script>

We have done with html page. Now we will move to silver light user control and open html page on button click.

Add following code in user control (main.xaml).


<Button Content="Show Html Page" HorizontalAlignment="Left" Margin="164,140,0,0" VerticalAlignment="Top" Width="117" Click="Button_Click"/>

Now add following button click handler and a helper function in main.xaml.cs to open html page.


private void Button_Click(object sender, RoutedEventArgs e)
{
ShowBrowser();
}

public void ShowBrowser()
{
try
{
string url = "http://webdesignpluscode.blogspot.com/";
HtmlPage.Window.Invoke("ShowBrowserIFrame", url);
}
catch (Exception ex)
{
throw ex;
}
}

This is all, We have done with code. Now create new folder 'Images' and place an image there 'Close.png' for close button.

Now build project and view in browser.

Friday, April 19, 2013

How to Enable and Disable ASP.NET TextBox Control on CheckBox Click in Java Script


  • Create New Project in Visual Studio 2010 (or in any version).
  • Add New Page ( named default.aspx ).
  • Add Following aspx Code in default.aspx page.

        <table style="width: 100%;">

            <tr>
                <td align="right" style="width: 50%">
                    <asp:Label ID="LabelClick" runat="server" Text="Click Me !!!"></asp:Label>
                </td>
                <td align="left" style="width: 50%;">
                    <asp:CheckBox ID="CheckBox" onclick="EnableDisableTextBox();" Checked="false" runat="server" />
                </td>
            </tr>
            <tr>
                <td align="right" style="width: 50%">
                    <asp:Label ID="LabelName" runat="server" Text="Name:"></asp:Label>
                </td>
                <td align="left" style="width: 50%">
                    <asp:TextBox ID="TextBoxName" runat="server" Width="70%"></asp:TextBox>
                </td>
            </tr>
            <tr>
                <td align="right" style="width: 50%">
                    <asp:Label ID="LabelAge" runat="server" Text="Age:"></asp:Label>
                </td>
                <td align="left" style="width: 50%">
                    <asp:TextBox ID="TextBoxAge" runat="server" Width="70%"></asp:TextBox>
                </td>
            </tr>
        </table>


  • Add Following Java Script Code inside head tag in default.aspx page.

    <script type="text/javascript" language="javascript">
        function EnableDisableTextBox() {

            var CallerCheckBoxID = "<%= CheckBox.ClientID %>";
            var LblName = "<%= LabelName.ClientID %>";
            var TxtName = "<%= TextBoxName.ClientID %>";
            var LblAge = "<%= LabelAge.ClientID %>";
            var TxtAge = "<%= TextBoxAge.ClientID %>";
            if (document.getElementById(CallerCheckBoxID).checked == true) {

                document.getElementById(LblName).disabled = true;
                document.getElementById(TxtName).disabled = true;
                document.getElementById(LblAge).disabled = true;
                document.getElementById(TxtAge).disabled = true;

            }
            else {

                document.getElementById(LblName).disabled = false;
                document.getElementById(TxtName).disabled = false;
                document.getElementById(LblAge).disabled = false;
                document.getElementById(TxtAge).disabled = false;

            }
        }
    </script>

You have all done. View it in browser.
Follow me on Facebook to get more cool tutorials. -:)

Friday, June 29, 2012

Java Script Tutorial 25 : JavaScript RegExp Object


A regular expression (RegExp) is an object that describes a pattern of characters. When you search in a text, you can use a pattern to describe what you are searching for. A simple pattern can be one single character. A more complicated pattern can consist of more characters, and can be used for parsing, format checking, substitution and more. 
Regular expressions are used to perform powerful pattern-matching and search-and-replace functions on text. Syntax of RegExp is as follow :


var patterntxt=new RegExp(somepattern,modifiers);
or
var patt=/somepattern/modifiers;


In above code, somepattern specifies the pattern of an expression. modifiers specify if a search should be global, case-sensitive, etc.


RegExp Modifiers are used to perform case-insensitive and global searches. For example we use i modifier for case-insensitive matching and g modifier for global match. Global match means, find all matches rather than stopping after the first match. For example 


var str1 = "This is some text.";
var pattern = /some text/i;
document.write(str1.match(pattern));


The result of above case-sensitive search will be : some text 


The test() method searches a string for a specified value, and returns true or false, depending on the result. For example


var pattern=new RegExp("s");
document.write(pattern.test("The sun rises in the east"));


Result of above code will be "true", as it contains the "s" string.


The exec() method searches a string for a specified value, and returns the text of the found value. It return null,  in case no match found. For example


var pattern=new RegExp("s");
document.write(pattern.exec("The sun rises in the east."));


Result of above code will be "s", as it contains the "s" string.

Java Script Tutorial 24 : JavaScript Math Object

The Math object allows you to perform mathematical tasks. The Math object includes several mathematical constants and methods. Syntax for using properties/methods of Math is as follows:


var x=Math.PI;
var y=Math.sqrt(16);


There is eight mathematical constants in JavaScript that can be accessed from the Math object. These mathematical constants are : 


E
PI
square root of 2
square root of 1/2
natural log of 2
natural log of 10
base-2 log of E
base-10 log of E.


We can call/reference these constants from JavaScript as below:


Math.E
Math.PI
Math.SQRT2
Math.SQRT1_2
Math.LN2
Math.LN10
Math.LOG2E
Math.LOG10E


There are many mathematical methods also available in JavaScript. For example Math.round() is used to round a number, e.g  


document.write(Math.round(9.8));


Result of above code will be : 10


Math.random() method of the Math object is used to generate random numbers. For example


document.write(Math.random());


Result of above code can be anything between 0 and 1.


We can set the limit of random number generation( by using arguments ). For example, the following code return random number between 0 and 20.


Math.random()*21)


To generate random number from 0 and 100 change 21 to 101.

Thursday, June 28, 2012

Java Script Tutorial 23 : JavaScript Boolean Object


The JavaScript Boolean object represents two values, "true" or/and "false". We can create a Boolean object in javascript as follows :


var myBooleanObj=new Boolean();


Javascript boolean object will set to false, if we do not set its initial value or has one of the following values:


0
-0
null
""
false
undefined
NaN


It will be true for any other value.

Java Script Tutorial 22 : JavaScript Array Object


An array is a special variable, which can hold more than one value, at a time. For example, if you have a list of items, storing the country names in single variables could look like as follow :


var country1="Pakistan";
var country2="USA";
var country3="Russia";


An array can hold all your variable values under a single name. And you can access the values by referring to the array name. Each element in the array has its own ID so that it can be easily accessed. We can defined array in following ways :


var country=new Array(); 
country[0]="Pakistan";
country[1]="USA";
country[2]="Russia";


or


var country=new Array("Pakistan","USA","Russia");


or


var country=["Pakistan","USA"," Russia"];


You can refer to a particular element in an array by referring to the name of the array and the index number. The index number starts at 0. For example


document.write(country[1]);


Result of above code will be : USA


To modify a value in an existing array, just add a new value to the array with a specified index number:


country[1]="Germany";


This code change the value USA to Germany inside array object.


document.write(country[0]);


Now It will result as : Germany


Java Script Tutorial 21 : JavaScript Date Object


The JavaScript Date object is used to work with dates and times. Date objects are created with the Date() constructor. We can initiate date by four ways:

  • new Date()
  • new Date(milliseconds)
  • new Date(dateString)
  • new Date(year, month, day, hours, minutes, seconds, milliseconds)

We can operate a number of methods after creating a date object. These method allow you to get and set value of year, month, day, hour, minute, second, and milliseconds of the object. All dates are calculated in milliseconds from 01 January, 1970 00:00:00 Universal Time (UTC) with a day containing 86,400,000 milliseconds.
For example


var today = new Date()
var d1 = new Date("October 13, 1975 11:13:00")
var d2 = new Date(79,5,24)
var d3 = new Date(79,5,24,11,33,0)


Set/Manipulate Dates :
We can easily manipulate the date by using the methods available for the Date object. For example


var myDateobj=new Date();
myDateobj.setFullYear(2011,0,15);


Adding days to a date shifts the month or year, the changes are handled automatically by the Date object itself.


Compare Two Dates :
We can also use Date object to compare two dates. For example


var y=new Date();
y.setFullYear(2110,0,16);
var current = new Date();
if  ( y > current )
   {
       alert("Current Date is before 16th January 2110");
   }
 else
   {
       alert("Current Date is after 14th January 2100");
   }

Java Script Tutorial 20 : JavaScript Objects


JavaScript is an Object Based Programming language, and allows you to define your own objects and make your own variable types. 
An object is just a special kind of data. An object has properties and methods. We can create our own objects in java script, which will be discussed in future tutorials. 


Properties :
Properties are the values associated with an object. For example


<script type="text/javascript">
     var txt="This is text.";
     document.write(txt.length);
</script>


In above code, txt is an object and length is its property. Result displayed in browser will be : 13


Methods :
Methods are the actions that can be performed on objects. For example


<script type="text/javascript">
     var txt="This is Text";
     document.write(txt.toUpperCase());
</script>


In above code txt is an object and toUpperCase() is method.  Result displayed in browser will be : 
THIS IS TEXT


Tuesday, June 26, 2012

Java Script Tutorial 19 : JavaScript Special Characters


In JavaScript, Special characters can be added to a text string by using the backslash sign. For example we want to display following text in JavaScript code. 


var txt="This "This is a "big" Apple.";


In JavaScript, a string is started and stopped with either single or double quotes. This means that the string above will be chopped to: 


This is a  


We must place a backslash (\) before each double quote in "big" to solve this problem. This result string will look like this :


var txt="This "This is a \"big\" Apple.";


After executing in browser, it will display string as : 


This is a "big" Apple. 


There are many other special characters that can be added to a text string with the backslash sign, these are :


\'          (  single quote  )
\"         (  double quote  )
\\          (  backslash  )
\n         (  new line  )
\r          (  carriage return  )
\t          (  tab  )
\b         (  backspace)
\f          (  form feed  )

Java Script Tutorial 18 : JavaScript Throw


JavaScript throw statement allows you to create an exception. If you use this statement together with the try .. catch statement, you can control program flow and generate error messages. The exception can be a string, integer, Boolean or an object. Syntax of throw is as:


throw exception


For example


<!DOCTYPE html>
<html>
<body>
<script type="text/javascript">
var x=prompt("Enter a number between 2 and 5:","");
try

       if(x>5)
         {
             throw "Error 1";
         }
       else if(x<2)
         {
             throw "Error 2";
         }
 }
 catch(err)
 {
       if(err=="Error 1")
         {
              document.write("The value is higher then 5.");
         }
       if(err=="Error 2")
         {
              document.write("The value is lower then 2.");
         }  
 }
</script>
</body>
</html>


Java Script Tutorial 17 : JavaScript Try .. Catch

JavaScript try .. catch statement allows you to test a block of code for errors. The try block contains the code to be run, and the catch block contains the code to be executed if an error occurs. Syntax of JS try .. catch is :


try
  {
       // code
  }
catch()
  {
       // Handle errors
  }


For example


<!DOCTYPE html>
<html>
<head>
<script type="text/javascript">
var txt="";
function Showmessage()
{
     try
       {
            adddlert("JS try .. catch testing ....");
       }
     catch(err)
       {
            txt="There was an error on this page.";
            alert(txt);
       }
}
</script>
</head>
<body>
   <input type="button" value="Click to View message" onclick="Showmessage()" />
</body>
</html>

Friday, June 22, 2012

Java Script Tutorial 16 : JavaScript Events

Events are actions that can be detected by JavaScript. Every element on a web page has certain events which can trigger a JavaScript. For example, we can use the onClick event of a button element to indicate that a function will run when a user clicks on the button. We define the events in the HTML tags. Following are some events we use in javascript.
  • A mouse click
  • A web page loading
  • Mousing over
  • Selecting an input field
  • Submitting an HTML form
  • A keystroke
Details of some some events are below.


onLoad and onUnload :
The onLoad and onUnload events are triggered when the user enters or leaves the page. The onLoad event is often used to check the visitor's browser type and browser version, and load the proper version of the web page based on the information.


Both the onLoad and onUnload events are also often used to deal with cookies that should be set when a user enters or leaves a page.


onFocus, onBlur and onChange :
The onFocus, onBlur and onChange events are often used in combination with validation of form fields. In following example the validateEmail() function will be called whenever the user changes the content of the field.


<input type="text" size="30" id="email" onchange="validateEmail()" />


onSubmit :
The onSubmit event is used to validate ALL form fields before submitting it. In following example, the validateForm() function will be called when the user clicks the submit button in the form. If the field values are not accepted, the submit should be cancelled. The function validateForm() returns either true or false. If it returns true the form will be submitted, otherwise the submit will be cancelled.


<form method="post" action="mypage.htm" onsubmit="return validateForm()">


onMouseOver :
The onmouseover event can be used to trigger/call a function when the user mouses over an HTML element.

Java Script Tutorial 15 : JavaScript Functions


Function :
A function is a block of code that executes only when you tell it to execute. It can be when an event occurs, like when a user clicks a button, or from a call within your script, or from a call within another function. Functions can be placed both in the <head> and in the <body> section of a document, just make sure that the function exists, when the call is made. Syntax to write a function is as follows :


function functionname()
{
     some code
}


The word function must be written in lowercase letters. Example of JavaScript function is below.


<!DOCTYPE html>
<html>
<head>
<script type="text/javascript">
function myfunc()
{
     alert("Called by JS Function!");
}
</script>
</head>
<body>
<button onclick="myfunc()">Click Me !</button>
</body>
</html>


Function with Arguments :
When you call a function, you can pass along some values to it, these values are called arguments or parameters. These arguments can be used inside the function. You can send as many arguments as you like, separated by commas (,). Declare the argument, as variables, when you declare the function. Syntax to write function with arguments is as follow :


function myfunc(var1,var2)
{
      some code here.
}


For example


<script type="text/javascript">
function myFunction(var1,var2)
{
alert("you passed " + var1 + ", and " + var2);
}
</script>
<button onclick="myfunc('isb','pak')">Click Me !</button>


Functions With a Return Value :
Sometimes you want your function to return a value back to where the call was made. This is possible by using the return statement. When using the return statement, the function will stop executing, and return the specified value. Syntax of function with return value is as follow :


function myfunc()
{
     var y=10;
     var z=5;
     return y+z;
}


The function above will return the value 15. The function-call will be replaced with the returnvalue. For example


var x=myfunc();


After executing function "myfunc", value of x will be 15. The return value of function can be directly written into html elements. For example


document.getElementById("id").innerHTML=myfunc();


The return statement is also used when you simply want to exit a function.

Thursday, June 21, 2012

Java Script Tutorial 14 : JavaScript For .. In

The for  .. in statement loops through the properties of an object. Syntax of for .. in is as follow :


for (variable in object)
  {
        code to be executed
  }


For example


var person={fname:"waqas",lname:"ali",age:23}; 
for (y in person)
  {
       txt=txt + person[x];
  }


The result of above code will be


waqasali23

Java Script Tutorial 13 : JavaScript Break and Continue


The break Statement :
The break statement will break the loop and continue executing the code that follows after the loop.For example, in following code, for loop will stop its execution when value of i equal to 3, and code continue execution after this for loop. 


for (i=0;i<7;i++)
  {
  if (i==3)
    {
    break;
    }
  y=y + "The number is " + i + "<br />";
  }


The result of above code will be :


The number is 0
The number is 1
The number is 2


The continue Statement :
The continue statement will break the current loop and continue with the next value. For example, in following code the for loop skip its iteration at value equal to 3 and then continue its execution normally.


for (i=0;i<=7;i++)
  {
  if (i==3)
    {
    continue;
    }
  y=y + "The number is " + i + "<br />";
  }


The result of above code will be :


The number is 0
The number is 1
The number is 2
The number is 4
The number is 5
The number is 6
The number is 7

Java Script Tutorial 12 : JavaScript While Loop


The while Loop :
The while loop loops through a block of code while a specified condition is true. Syntax of while loop is as follow :


while (variable<endvalue)
  {
       code to be executed
  }


For example


while (i<3)
  {
  y=y + "The number is " + i + "<br />";
  i++;
  }


The above while loop will run when value of i less then 3, and it will stop working when it is exceed or equal to 3.


The do  .. while Loop :
The do .. while loop is a variant of the while loop. This loop will execute the block of code once, before checking if the condition is true, then it will repeat the loop as long as the condition is true. Syntax of do .. while loop is as follow :


do
  {
       code to be executed
  }
while (variable<endvalue);


For example


do
  {
  y=y + "The number is " + i + "<br />";
  i++;
  }
while (i<3);


The above loop will run once before checking condition, and then it will check condition every time, and run only if condition met.