Monday, February 29, 2016

How To: Add Marker/Pin on Google Map

In this lesson we will learn how to add pin/market on google map at specific point (coordinates: latitude and longitude). Add following code to add google map in html page with basic map properties.

<html>
<head>
    <title>Google Map!</title>

    <script src="http://maps.google.com/maps/api/js?sensor=false" type="text/javascript"></script>
    <script type="text/javascript">
        var map = null;

        function initialize() {
            var latlng = new google.maps.LatLng(31.536648, 74.343443);
            var myOptions = {
                zoom: 12,
                center: latlng,
                mapTypeId: google.maps.MapTypeId.ROADMAP
            }

            map = new google.maps.Map(document.getElementById("map_area"), myOptions);

        }

    </script>
</head>
<body onload="initialize()" style="width: 98%; height: 100%;">
    <div id="map_area" style="width: 100%; height: 520px;">
    </div>

</body>
</html>

Now create another java script function AddMarker() to add pin on google map, in this function we will set basic properties of pin like its position ( coordinate: latitude and longitude) and its title. Add following code in <script> </script> tag inside head section of web page.

        function AddMarker() {          
            var myLatlng = new google.maps.LatLng(31.5136648, 74.343443);
            var marker = new google.maps.Marker({
                position: myLatlng,
                map: map,
                title: 'Lahore, Pakistan.'
            });
        }

Now create a new button in html and call this function on onclick event of button. Add following code immediately before </bode> tag.

<input type="submit" onclick="AddMarker()" name="button" title="Add marker" />

Complete code of all steps is

Add Pin on Google Map
Add Marker/Pin on Google Map

This is all. You have done. Save file and view in browser.
How To: Add Google Map in Html Page

Adding google map to html page is very easy and a common practice now a days. In this tutorial we will learn how to add google map in web page step by step.
First create a basic structure of html page.
Open any text editor, paste following code there and save it as GoogleMap.html file.

<html>
<head>
    <title>Google Map!</title>

</head>
<body style="width: 98%; height: 100%;">
    <div id="map_area" style="width: 100%; height: 520px;">
    </div>
</body>
</html>

Now add following google api reference in page head section.

<script src="http://maps.google.com/maps/api/js?sensor=false" type="text/javascript"></script>

Now we will create a java script function to initialize google map.  We will set basic map properties in this function while initialization. Add following function in page head section inside <script> </script> tags.

<script type="text/javascript">
        var map = null;

        function initialize() {
            var latlng = new google.maps.LatLng(31.536648, 74.343443);
            var myOptions = {
                zoom: 15,
                center: latlng,
                mapTypeId: google.maps.MapTypeId.ROADMAP
            }

            map = new google.maps.Map(document.getElementById("map_area"), myOptions);

        }
    </script>

Now call this function on onload event of body of web page.

<body onload="initialize()" style="width: 98%; height: 100%;">
    <div id="map_canvas" style="width: 100%; height: 520px;">
    </div>
 
</body>

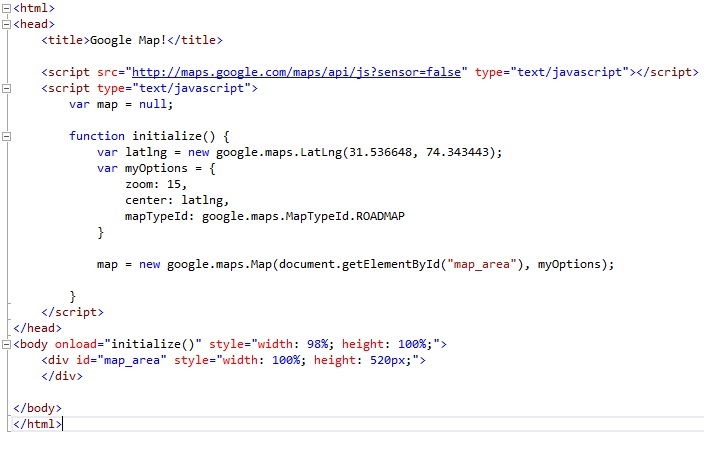
Complete code of all setps will look like:

Add Google Map in Html Page

This is all. You have done. Save file and view in browser.

Sunday, February 28, 2016

How To: Call Java Script Function from Silverlight

In this tutorial we will learn, how to call java script function from silver light using C#. HtmlPage.Window.Invoke function is used invoke the java script method from silver light application.

Add following C# code, where you want to call java script function.

HtmlPage.Window.Invoke("SayHello");

Add following java script code in aspx or html page in silver light web project.

function SayHello()
{
alert('Hello! function called from silverlight');
}

Java script function with parameters:

To call java script function with multiple input parameters, add following C# code in .cs file.

HtmlPage.Window.Invoke("SayHello", "Waqas", "A");

Add following java script function in aspx or html page in silver light web project.

function SayHello(fname, lname)
{
alert('Hello! ' + fname + ' ' + lname +
' -function called from silverlight');
}

This is all. You have done.
Build project and view in browser.

Saturday, February 27, 2016

How To: Integrate HTML Page in Silverlight Application

Integrating Html page in silver light application is little tricky at first. In this tutorial we will learn how to display html page in silver light application step by step.

Add following code in silver light  html page immediate before </form> tag.

<div id="BrowserDiv">
<div style="vertical-align:middle">
<img alt="Close" align="right" src="Images/Close.png" onclick="HideBrowser();" style="cursor:pointer;" />              
</div>
<div id="BrowserDiv_IFrame_Container" style="height:95%;width:100%;margin-top:37px;"></div>
</div>

Add following css code in page.

<style type="text/css">

#BrowserDiv
{
position:absolute;
background-color:#484848;
overflow:hidden;
left:0;
top:0;
height:100%;
width:100%;
display:none;
}

</style>

We need following javascript code to show and hide htm page.

<script type="text/javascript">

var slHost = null;
var BrowserDivContainer = null;
var BrowserDivIFrameContainer = null;
var jobPlanIFrameID = 'JobPlan_IFrame';

$(document).ready(function () {
slHost = $('#silverlightControlHost');
BrowserDivContainer = $('#BrowserDiv');
BrowserDivIFrameContainer = $('#BrowserDiv_IFrame_Container');
});

function ShowBrowserIFrame(url) {
BrowserDivContainer.css('display', 'block');
$('<iframe id="' + jobPlanIFrameID + '" src="' + url + '" style="height:100%;width:100%;" />')
.appendTo(BrowserDivIFrameContainer);
slHost.css('width', '0%');
}

function HideBrowser() {
BrowserDivContainer.css('display', 'none');
$('#' + jobPlanIFrameID).remove();
slHost.css('width', '100%');
}

</script>

Add reference to following jquery file.


<script type="text/javascript" src="Scripts/jquery-1.4.2.min.js"></script>

We have done with html page. Now we will move to silver light user control and open html page on button click.

Add following code in user control (main.xaml).


<Button Content="Show Html Page" HorizontalAlignment="Left" Margin="164,140,0,0" VerticalAlignment="Top" Width="117" Click="Button_Click"/>

Now add following button click handler and a helper function in main.xaml.cs to open html page.


private void Button_Click(object sender, RoutedEventArgs e)
{
ShowBrowser();
}

public void ShowBrowser()
{
try
{
string url = "http://webdesignpluscode.blogspot.com/";
HtmlPage.Window.Invoke("ShowBrowserIFrame", url);
}
catch (Exception ex)
{
throw ex;
}
}

This is all, We have done with code. Now create new folder 'Images' and place an image there 'Close.png' for close button.

Now build project and view in browser.

Sunday, April 26, 2015

How to Convert BitmapImage to Storage File in Windows Phone 8.1 Win RT

BitmapImage to Storage File conversion requires following steps.
  1. BitmapImage to byte array conversion.
  2. Creation of temporary StorageFile.
  3. Writing byte array data on empty storage file.
BitmapImage to byte array conversion

BitmapImage bitmap = ImageBoxPreview.Source as BitmapImage;

RandomAccessStreamReference rasr = RandomAccessStreamReference.CreateFromUri(bitmap.UriSource);

var streamWithContent = await rasr.OpenReadAsync();

byte[] buffer = new byte[streamWithContent.Size];

await streamWithContent.ReadAsync(buffer.AsBuffer(),(uint)streamWithContent.Size, InputStreamOptions.None);


Creation of temporary StorageFile

StorageFile file = await ApplicationData.Current.LocalFolder.CreateFileAsync("temp.jpeg", CreationCollisionOption.ReplaceExisting);


Writing byte array data on empty storage file

using (IRandomAccessStream fileStream = await file.OpenAsync(FileAccessMode.ReadWrite))
{
      using (IOutputStream outputStream = fileStream.GetOutputStreamAt(0))
      {
               using (DataWriter dataWriter = new DataWriter(outputStream))
               {
                      dataWriter.WriteBytes(buffer);
                      await dataWriter.StoreAsync(); // 
                      dataWriter.DetachStream();
               }
               // write data on the empty file:
               outputStream.FlushAsync();
       }
        fileStream.FlushAsync();
}


Complete code will be:


Convert BitmapImage  to Storage File in Windows Phone 8.1 Win RT

Convert BitmapImage to Storage File in Windows Phone 8.1 Win RT.